
9/21
I just got back from autoxing and drag racing at Englishtown. I would love to be in the
11's! Hmm... I guess I design make a twin turbo for the IROC-Z. That wouldn't be too
hard...
9/22
I searched the web, and found some similar projects
Eric Weber's Twin Turbo 1988 GTA
GALE FORCE Twin Turbo 1982 Camaro
Gary's 1981 Convertible Twin Turbo Trans Am
I emailed many turbo companies, Callaway, Team.Net, and the third gen Camaro list. I
listed my plans, and got opinions. Several people emailed me back, including Gary M from
Team.Net. He's been very helpful with details. He has an 83 Turbo
Celica with 350 hp. I also called Gale
Banks Engineering for details on their 82 Twin Turbo Camaro. Since it has been out of
production for 15 years, they didn't have any information. The person in tech is going to
dig out their old archives and mail me everything he can find on their twin turbo.
9/23
I spoke with one of my mechanical engineering professors about the possibility of doing
this as a design project. He was supportive, and sent me on my way to find a decent topic
that is research/development, and not just building a car. If you have any ideas, let me
know.
9/24
Tried to get in touch with Callaway about their old twin turbo Corvette. The secretary was
very pleasant and helpful, but none of my calls/voicemails/emails have been returned. I'm
waiting, but not counting on it. I also called Conti Engineering. Joe Conti answered a
few questions, and gave me a quote for the two turbos.
9/25
I searched the Amazon.com book lists, and found several on turbochargers, their design,
and applications. I also went to the campus library, and borrowed several books.
9/26
I ordered from Amazon.com today:
9/27
I searched on the Dynojet site for local chassis dynos in order to get a baseline for the
before and after of the engines power. I called Danielson Ford in CT about
arranging dyno time in exchange for project sponsorship and advertising at races. Charlie
liked my idea, didn't like that I had a Chevy. I have to give him a few days to recognize
the helping a Chevy isn't evil ;) and I'll call back on Wednesday. I called HMS Motorsports and spoke to Doug. He was
interested in sponsoring this project, and will forward the idea to the owner of HMS for
approval. This will help promote their Dynojet facilities and tuning. I also called ACS Racing here in MA, but the no one
answered.
10/1
I spoke to HMS Motorsports today, and they
generously donated dyno time, pending the official approval of this Tufts Design Project.
Thank you very much! I'm currently working with department faculty in having
this project legitimized as soon as possible so I can begin the project. I also received
product literature from Garrett Turbochargers today, and ordered brochures on the Haltech
ECM's.
10/3
Amazon.com mailed my books today, so I should have them on Monday. The HMS dynotime is
official today, and I will stop by tomorrow to see their shop. Mike Rizzi suggested calling this the Z28TT,
which I love! Here is a short article Steve Scott emailed to me on Andy Granatelli's twin
turbo 900 HP 82' Camaro, from Hot Rod Magazine.
Here is my preliminary list of parts needed:
If you have any of these parts, and would like to get rid of them cheaply, or donate them, I will be eternally grateful and let you take the finished Z28TT for a spin. The driveline isn't as important, since I can take it easy, and make that last as long as I keep the boost mild. The gauges and fuel system I want to install before I begin the turbo work. I was considering electric fuel pressure gauges, but I heard their response is slow.
10/6
I am back from the Horsneck
Beach autox, where I placed second to the class champion (who only beat me by 0.07
seconds!) More importantly, I was able to talk to Mike Zoner, who is the chief engineer at
Callaway Cars. Mike answered all my questions
(that I could think of) and gave me a few tips while he was at it (such as don't do the
extra injector on a TPI). My books from Amazon.com came in today also, so I have some
reading/learning to do, and I'll be able to begin designing the system.
10/11
I just finished reading Corky Bell's "Maximum Boost" and did a few preliminary
calculations. I can use a 30 lb/hr injector for Stage 1 if I raise the fuel pressure to 60
psi at maximum boost. This can be accomplished by a Fuel Management Unit (like Vortech or
Paxton's) that raises the fuel pressure as boost increases. Click on cfm_inj.mcd to download a
MathCAD file of my preliminary calculations. It has several engines, boosts, and injectors
calculated to give me an idea of what some general numbers are.
Here are my basic calculations for choosing the turbos. I'll probably want an A/R ratio of 1.2 for lower back pressure. The V8 small block has good off boost torque, so immediate response is not a priority.
Stage 1 (305 cid engine, 6 psi boost, 450 hp, 5500 rpm redline, .90 Ve)
Stage 2 (383 cid, 14.7 psi boost, 700 hp, 5500 redline, .90 Ve)
I should be able to find a turbo that can work for both applications. I will definitely need to change injectors, so I will maximize that for the 450 hp now.
10/13
As most of you know, my twin turbo project is coming along pretty
nicely. After Sunday's autox (I got first!) I spent a few hours Monday at Callaway with Chris McCulloch (f-body list member)
talking to Mike Zoner. We discussed intercooling and exhaust options. The setup would be
either one intercooler in in each corner (at a 45 degree angle from vertical) and duct the
hot aftercooled air out the top of the hood with an exiting duct, or weld two intercoolers
together with a plenum in the middle and mount that in front of the radiator. For this set
up, I would have the pressurized air enter the intercooler plenum at the top corners, and
exit the plenum in the bottom center. That seems to be the best way, although it would be
cool to see intercoolers looking down my hood!
The easiest way to build the headers will be to use Weldels. These are
pre bent pipe pieces that you weld together to make something :) Callaway used it for
their twin turbo vette, but they are damned heavy! The other option is using T-304 SS
tubing, but then I have to mandrel bend everything. I have to check the Omega catalog now
also, since I'd like to put a K-type thermocouple in each header tube to help set up the
fuel injection properly (and prevent a meltdown!)
I also ordered the 225L/hr Walbro intank fuel pump today. It can support up
to 850 hp!!! It's getting there.
10-24
Today I built an Air/Fuel meter from plans on the DIY_EFI page.
The meter shows the car is running properly, but at WOT, it leans out at the higher rpm. I
guess those 19 lb/hr injectors just can't flow enough fuel. I'll do more testing with
different fuel pressures.
10-27
I picked up my 30 lb/hr fuel injectors today, and had them verified to make
sure they are authentic. I also spoke to Joe from HMS, and will dyno the Camaro. Hopefully
I'll have the injectors in before I dyno.
This weekend was spent up at New Hampshire
International Speedway, autoxing and trying my first rally. I got another 1st place in
the autox with a 2 second margin even after ESP was bumped up to ASP. I spoke to Mike
Zoner at the autox, and found out that I can still use the stock fuel pump harness for the
new pump.
10-31
Tonight a few of us met up at New
England Dragway for the last night this year. Temperatures were down, and speeds were
up. I finished the night with a 13.516@104.1. I also borrowed the Diacom from BJ Hansen, and could see
exactly what the computer was doing.
11-1
I headed up to HMS motorsport
today for some baseline dyno runs. This is important because I'd like to measure the
effectiveness of the turbochargers once they are on. I took a whopping 16 dyno pulls with
many different combinations. The best combination was a cold engine (100 degrees), base
fuel pressure (42 psi) and 10 degrees of timing. My peak rear wheel horsepower was 274.2
hp at 4200 rpm. The peak rear wheel torque was 398.6 ft-lbs at 3000 rpm. Raising the fuel
pressure lowered peak torque, which surprised me. I thought since I was leaning out at
higher rpm, the higher fuel pressure would give more power from the extra fuel. Increasing
the throttle position sensor voltage didn't increase torque either, so I left it at 4.63
volts at wide open throttle. Raising the timing also didn't do a thing, since the knock
sensor was going off as soon as I hit wide open throttle. I'm guessing this is from the
exhaust leak at the #8 header joint. This is getting exhaust pulses right onto the sensor,
probably setting it off. Temperature affected the readings noticeably. I lost 20 ft-lbs
when I took a few hot (200 degrees) dyno runs. We also did a coast down run, to see what
the driveling losses were. This is dependent on speed, and the results are from my 4th
gear (1.00 tranny ratio and a 3.08 rear gear ratio). The line is linear, starting with 30
horsepower at 50 mph going to 110 hp at 125 mph. This means my engine is actually closer
to 350 hp at 4500 rpm. Since rear wheel horsepower is all that is important, this was only
to satisfy curiosity. A big thank you to Joe and Doug at HMS for donating their time and
dyno today for this project.
11-6
With the information gathered on the Diacom during the 16th dyno run, I calculated
the volumetric efficiency of the engine. It is a regular curve, starting at 80% at 1875
rpm, peaking at 96.1% at 3150 rpm, and then curving back down to 68% at 5200 rpm. View The VE Graph
11-14
I attempted to get efficiency maps from Garret today, but no one knew where to get
them. I got transferred to at least 5 different departments/wholesalers/dealers and no one
knew anything. I finally gave Corky Bell a call on a whim, and he suggested contacting
Turbonetics in California. They publish a catalog with all the specifications of most
turbos. I should be getting that soon.
12-2
I received both my fuel pump and Turbonetics catalog yesterday. I was looking
through the catalog, and choosing suitable turbos. I made a few more calculations to help
choosing the turbos. Pressure ratio of 1.8 was chosen with a 8 psi manifold goal, and 3
psi loss through intake and intercooler.
The turbo unit that seems to match this the best would be the T04E 50 trim unit. The efficiency is 78% at this point, and the compressor will need to be spun at 84,000 rpm. The fuel pump will be installed next month as well as removing the air conditioning system to make room for the turbos. I will also be removing the SLP headers and reinstalling the stock manifolds to save time once I need to make the turbo headers. For now, I just need to get the gauges to complete Stage One. Everything os going on schedule.
1-10
Over this winter's break, I've removed my AC system (saved 26 lbs) and sold the SLP
headers to raise some much needed funds. I'm currently installing the Walbro intank fuel
pump and working on an information package for magazines and sponsors. This site along
with my Camaro Site is
featured in the March (current) issue of High Tech Performance. I'll add another update
once I am back at Tufts in a week, and also put the current daily news on the main page.
We've also had over 1000 hits since the Tufts Twin Turbo project was put on the web. I
thank all of you for visiting.
1-29
All of the initial design considerations are completed, and now I'm starting
to look for the specific parts I need. The article in High Tech Performance has really
given this site some publicity, along with good input from other car enthusiasts.
Currently I'm working on setting up a time schedule for this project, along with a
concrete budget for the sponsors and Mechanical Engineering Department. I have my
sponsorship proposal in a draft stage, and am working on final revisions tonight as soon
as I get the financial details worked out.
On a different note, the third gear synchro on my T-5 transmission has decided to go south, which means I'm going to need a new transmission as well. I'm considering either a Tremec TKO 5 speed (485 ft-lbs) or a T-56 six speed (450 ft-lbs). The Tremec would be a much easier bolt-in application, but is only a five speed. The T-56 on the other hand, has a very deep overdrive (.50) but would require some custom fabrication. The largest hurdle with the T-56 is adding a mechanical speedometer drive instead of the electronic VSS (vehicle speed sensor) built into the transmission. I could get an electronic speedo from a junkyard, add the Cyberdyne box, and do it that way.
2-5
I've completed a Gantt Chart outlining the project and organizing everything into a
schedule. The key dates are receiving parts from sponsors starting February 23rd, a huge
weekend long install where I'll be putting in a new transmission, rear, fuel pump,
injectors, 145 mph electric speedometer, boost and fuel pressure gauges, and finally
converting over to a MAP style ECM.. This will be March 6-8. The turbo install will be on
March 13 (Friday too!) and it should be running by that evening. The project should be
completed by the end of March, when I'll go to a High Tech Performance photo shoot for the
upcoming article. I've also compiled a budget with all my needed parts. The bad news is
that the cheap way is around $5000 and the expensive way is around $9000. I thought I
would be able to do it cheaper, but it makes sense to do it the right way first. On a
different note, I've been in touch with several sponsors, and the support is great. I'll
try to post the schedule and budget by the end of the weekend.
2-11
Great news! The Department of Mechanical Engineering is partially funding the
project with a several hundred dollar budget! This will be enough to get me started, and
cover some smaller expenses. I've completed the sponsorship proposal packages, and they
will be mailed off tomorrow to those lucky companies. Camaro Heaven in NH is now also a
sponsor, donating necessary junkyard parts. I'll be driving up Friday to pick up the
parts. If you ever need 3rd generation f-body parts, this is the place to call
1-800-Camaro-1.
2-12
Today I did some preliminary measurements for the intercooler. We found that if you
move the top of the radiator 1.5" rearward, there is plenty of space to pass through
a 3" tube. The general idea is to have 2 intercooler cores getting air from each
corner of the engine bay. The cores will join in a common plenum in the center. The intake
will continue up through a hole in the center of the frame (right in front of the
radiator) over the radiator, and then into the throttlebody. The air filters will be
located where the battery and charcoal canisters are now (corner of the engine bay). I now
need to calculate the size of the tubing and intercooler core sizes.
2-13
I picked up an aluminum 1LE driveshaft (takes care of the vibrations at high
speeds), a non-AC heater fan box (more space in the engine bay) and a spare serpentine
belt tensioner (to make measurements, and fabricate a replacement) at Camaro Heaven.
2-16
Today I put in the aluminum driveshaft at Eric Kay's house and it solved the
vibrations!!! It's silky smooth at high speeds now :) We also installed the non-AC heater
box, which was a PITA. The AC version that was in the car had hidden bolts, and I ended up
breaking the box in pieces removing it. The electrical connections didn't match and a bolt
hole was about 1/2 inch off. We ended up using my AC blower motor, the non-AC fan wheel
(which will have to be turned down on a lathe since it rubs now) and drilling a new hole.
Why does everything take longer than expected? I have to cut the hole for a resistor
assembly larger to fit my AC resistors (4 instead of 3 for the non-AC)
I also calculated the requirements for the intercooler (IC) tonight. For 735 CFM (10 psi, 305 cid, 5500 rpm) I would need an intercooler that is 27" wide and 3" deep. The formula I used doesn't take height into account. If I plan to install the IC in front of the radiator, I'm limited to a width of 25" effective width and 31" total width. Total height can't be more than 17" either. I'm planning on calling Spearco or other IC companies tomorrow, and I'll find out if I can use the intercooler from a Turbo Trans-Am, or fabricate my own.
2-19
The Spearco Intercooler catalog arrived today, and I've chosen a good core.
It will go lengthwise across the area in front of the radiator (narrow and long), with one
inlet and one exit. The inlet will have a Y so both turbos can join together. The wide and
short intercoolers had pressure drops that were much larger. The usable frontal area
couldn't have been as large either, since you have the tanks going the length of the IC,
instead of just at the ends. My choice for today is the Spearco 2-182 core, which at 735
CFM and 10 mph of ambient airflow has a pressure drop of 0.6 psi and an efficiency of 82%.
I'll scan in the performance chart when I get a chance. I will most likely have to
fabricate my own end-tanks to place the inlet/outlet at the top of the intercooler facing
rearward. This will get rid of 4 90 degree elbows, which are around a 1% loss per 90
degrees (just add up the degrees of turning, and you've got a rough loss number...) I'm
still working on the details...
I've also started designing my serpentine belt pulley/tensioner which will let me remove the AC compressor and A.I.R. pump (for off-road use only)
2-24
I've finished the rough design of the AC/A.I.R. removal bracket. Take a look
at the AutoCAD drawing.
I've been busy trying to determine the transmission to use
with the Z28TT. The Borg Warner T5 is getting starting to get old, and just won't handle
the torque I'm planning on having. My choices are the Borg Warner T56 6
speed transmission out of a junked 94+ f-body, or a Tremec TKO 5 speed from Forte's Parts
Connection. They are both identical with the rated torque and also
very close in price, but I'd like to have the 6 speed for highway cruising. Besides, it
would be unique to have the 6 speed, and I could pick up the junkyard
transmissions cheaper than the Tremecs. The major problem is that the T56 speedometer
signal is electrical, and my speedometer needs a mechanical signal (from the speedo
cable). I could get a Cyberdyne calibration box, and speedometer, which might work, or I
could get a $300 kit from JTR that converts it. Unfortunately, the
owner didn't like to give information that could persuade me to buy his kit. He just
wanted me to buy his book on converting from TBI to TPI (since I have TPI, why
should I spend $25 on a book for 2 pages of information). If anyone out there in net-land
has this book, please email me, and let me know if it's worth buying for my
application. I also called Cyberdyne tech today, but the gentleman was busy, and should
call me back today or tomorrow. If the Cyberdyne speedometer and
computer will work, then I'll go ahead and do that. If not, I'll just bolt in the Tremec,
and enjoy that.
2-27
Great news! Accel, Autometer, and Turbonetics have all joined supporting
the Z28TT project. I have to thank Job Spetter from Turbo People in NY for helping me with
the sponsorship and connections. I should have the Accel DFI w/ Calmap software in a week,
along with Auto Meter's Ultralight boost/vac
gauge, fuel pressure gauge, and isolator with braided line. I'll be getting my turbos from
Turbonetics when I get a chance to finalize the details. I sincerely thank the sponsors
for keeping this project going, and helping this out. I should have everything except the
turbos installed in two weeks during my spring break when I have access to all the
airtools/jacks/etc... If you're in southern NY (10 min from NJ) and can lend a hand, I can
really use the help. Thanks everyone!!!
I ordered
the turbos!!!
3-2
More news... I ordered the turbos from Turbonetics today. There's no turning back
now! I'm getting two TO4E 40 series O trim .58AR turbos, along with 2 Deltagate
wastegates, an aluminum blow off valve, and 2 K&N 3"x6" cone filters. I also
finally got in touch with Ron Fleetham of Gale banks fame. They still have the turbo
manifolds, so it looks like I'm in business! Everything is going great, and now I need to
start installing these parts. They should start arriving any day now.
I also figured out how to do the wiring for a T56 transmission, with the help of Ron Duff. Basically I need to get the electric speedometer from a firebird (Which Kevin Dew is graciously donating) and the VSS Buffer box from that same style speedo. I also need the Cyberdyne calibrator box, unless someone can tell me how to make one (convert 40 pulses per driveshaft revolution to 2000 pulses per mile on a 5 or 12 volt "digital" signal). I would wire the calibrator in-line between the transmission (and VSS sender unit) and the VSS Buffer box. The buffer box has 3 outputs-speedo,cruise,ECM which I will wire into the original harness. Easy as cake ;) (you don't know how long and how many people I've had to talk to to get this far!) I'm buying a used T56 tranny from an f-body list member, and thats going in over spring break as well.
3-4
The turbos should be here by March 10, and the electric speedometer Kevin Dew
generously gave arrived today also. We figured out how to convert the 40 pulse per rev
signal to the 2000 pulse per mile using a BASIC stamp chip. You basically have to program
it to send one pulse for every 50 (around that) input pulses. I'm not sure what the VSS
signal looks like, but I might put it on an oscilloscope to check. If someone knows what
the signal looks like, let me know :)
I also came up with an intercooler design that should work pretty efficiently. Take a look at the AutoCAD drawing. The inlet and exit tube are at the top of the IC, are canted 15 degrees above horizontal, and have a 3" diameter. This should be enough to flow over 1100 CFM when I'm finished, but a little on the large side for 750 CFM...
3-9
I ordered the T56 tranny today, and it should arrive home in NY by Friday, just in
time for the spring break install. Camaro Heaven is also helping out with a 9 Bolt 1LE
Disc brake rear, which is also going to go in. For now, I'm finishing the details on the
fuel system, and getting all the right connectors. I'm using a -10AN braided stainless
steel line for the fuel feed and a -6AN return line. The challenge is getting fittings to
fit the TPI fuel rails, but Earl's does make 16mm*1.5
and 14mm*1.5 fittings. I will need to get an adapter to match the fitting to the braided
line, though.
3-12
I finally got in touch with the right people at Spearco, and ordered a 2-182 core.
It should arrive Monday or Tuesday at home in NY. All the rest of my parts got delayed as
well. The DFI was addressed to Tufts University and sent to my room, but for some reason
the mailroom refused it and shipped it back. Accel is shipping another one to NY now. Auto
Meter's gauges got lost in the shuffle somewhere so they are also mailing the package
today, overnight, to Tufts. I hope it arrives before I leave tomorrow afternoon. The
turbos from Turbonetics also got held up since they didn't have sufficient wastegates.
They also shipped today to NY. I just wish people would inform me what is going on, and
return my calls. I think this is a good lesson to me on how to properly conduct business.
I will always return my calls promptly, which should keep my future customers happy. I
just get very frustrated when I leave 10 voice mail messages, and another 10 with the
secretary, and I don't get a call back. Enough venting for now :)
I picked up a set of Vette L98 Aluminum heads today, in the hope that they will fit the 305. If they do, I'm porting them and getting a three angle valve job. The aluminum heads should fight detonation better than the cast iron heads, and since the chambers are 5cc's larger, it should lower compression about a point. (I think)
3-24
I'm back from spring break, but it wasn't much of a break! I put in the
Walbro intank fuel pump, Accel Super Ram intake and manifold, Auto Meter boost and fuel
pressure gauges (these look amazing at night!) and the 30 lb SVO injectors. The SR intake
works really well, but since I haven't changed the chip to compensate for the larger
injectors, it runs way too rich, and I've actually lost some power. The Accel DFI system
came in over break, along with the turbos, wastegates, air filters, intercooler, blow off
valve, and a few more books. I finally bought myself a rollaway tool chest, so the
workshop at home is now organized. I wasn't able to make the firebird speedo fit in the
gauge cluster, so I think I'll just succumb to buying Cyberdyne's electronic speedo, as
much as I don't like it. I didn't have time to install the T56 tranny or the DFI...
I'm working on making a plug in harness for the DFI, so I don't have to
rewire the entire engine compartment. I've got the pinouts figured out, and just
need to actually go and do it. The only stumbling block is that the factory ECM has 2
circuits for the injectors, while the DFI has 4. I might have to hard wire these in...
I'm still waiting to talk to the Gale Banks Company about manifolds...
3-31
Gale Banks is coming through with the twin turbo cast iron manifolds. Ron
recommends extrude honing them, but at this stage, I'll live without it. I might port it
by hand, if that helps. He's also sending me the pieces necessary to make the downpipes
and y-pipe. I'll have to get that welded up, since the tolerances are so tight, Gale Banks
stopped selling the welded up pieces because they always rubbed against something. I'll
coat them myself also. Next year when it is extrude honed, I'll get it coated inside and
out by Jethot or HPC.
Accel also gave the the go-ahead to run 4 injectors off of one driver, as
long as they are high impedance types. I assume SVO's are, so I'm in luck. I need to repin
the stock connector, and put the DFI in now. Soon. The car is running extremely rich with
the 30# injectors, and goes slower when I floor it :p THe o2 sensor is always over 1000mV,
which is around 12:1 air:fuel, so I need to correct that. Surprisingly, mileage has not
gone down much.
4-4
We installed the DFI last night, and it went without a hitch. Instead of
using the DFI harness, I repinned the factory harness so the DFI would plug right into it.
Everything took about 3 hours to complete, in a very easy and straightforward way.
The DFI idles very well, and has a very nice stall prevention sequence that obviously
works, since it caught the near stalls gently. The program in the DFI also handled the 30
lb injectors much better, and did not run as overly rich as the Hypertech chip. My WOT
open loop bog is cured! I didn't have a chance to play with the fuel/timing maps yet, but
we'll see about that. This is another big step finished. Sigh. :)
4-8
We finally got the DFI to enter closed loop operation. The problem was that I
misunderstood the high closed loop option (it was actually the low limit, and a quick call
to Accel cured that). Performance is back up to the previous level, and we are now working
on part throttle response. I've been driving around for hours with a laptop programming
every few minutes at the side of the road. Many thanks to Cyrus and Mike Gove who have
helped with the driving and programming. The first autox of the season went smoothly as
well. I didn't do as well as I expected, but I suppose the rain during my heat had
something to do with my times ;)
4/13
I just got back from my trip back home to NY this weekend. Saturday was the High
Tech Performance EFI shootout at Englishtown. We tuned the DFI a little Saturday morning
and determined the distributor is off one tooth since the DFI picks up knock above 14
degrees advance. Once we added a better timing map, the car picked up a little speed.
Unfortunately, at WOT, the oxygen sensor spews garbage. We had to guess the fuel settings,
and at the strip, I could only manage a best of 14.4@98.3. This is slow compared to my
previous 13.5@104 without the SuperRam intake. I need to do some more tuning, and I'll add
the Accel heated O2 gauge which should fix that problem. On a different note, I swapped my
winter wheels and tires to my summer rubber :) I've got some nice ZR1 wheels riding on
some 315 35R17 rubber in the rear and 275 40R17 tires in the front. They look amazing, and
I should have some pictures scanned in eventually.
4/23
The Gale Banks turbo manifolds finally arrived today!!! I just need to weld up the
exhaust and intercooler and install the oil lines, and we'll be all finished! The
manifolds are a cast iron design with a port for the wastegate at the end of it.
Everything looks to be a nice, compact design. Gale Banks also included two mandrel bend
u-turns so I can make a y-pipe for it. Shouldn't be too hard (yeah right!) I also
installed the heated O2 sensor that came with the DFI. The tuning is slowly coming along,
and I think I'm up to around 300 hp (I was at 320 hp before the DFI and Super Ram intake).
I hope to get some more tuning in before the turbos get installed. I also took a few
pictures - Turbo Parts,
Walbro fuel pump,
the fuel tank, installing the fuel pump, super ram intake. If you
have any welding tips for aluminum, please email me. Hang in there, I'm almost done!
4/30
The project is eventually getting there! Today we went to HMS and did another few dyno runs to
get a more accurate baseline. We're down about 25 hp and 60 ft-lbs from last fall. This is
probably due to the restrictive stock manifolds instead of the SLP headers. The picture of
the dyno run compares last fall with the best one today, and then the same fuel curve, but
with the intake on. The intake cost around 10 hp! We've also now got a bay to work
in. I hope to get the oiling system on this weekend, and the exhaust cut and mocked up as
well. We'll get the welding done next week. The report was typed and handed in yesterday
as well. Nothing quite like 65 pages of turbo stuff!
5/3
We've got a bit of a setback right now. I finally secured a garage to
work in for this next week, and started taking the engine bay apart to test fit the
exhaust and intercooler. I must have measured wrong 2 months ago, since the intercooler is
about 2" too tall. There is no way it'll fit without major framework. The wastegates
look like they'll interfere with the serpentine belt accessories as well. I remember
hearing about using Mack Truck intercoolers for our application. If anyone has any leads
on truck junkyards where I can pick them up cheaply, I would greatly appreciate it. I've
got a final Monday, and then again Friday, so I have all week to finish this. Wish
me luck!
5/6
Cyrus and I have been working on the IROC every night now in the
garage. I wish we had it last month! We test fitted the Gale Banks manifolds and turbos on
both sides. To make them fit, I had to remove the A/C compressor, AIR pump, and
alternator. I had to cut the back half of the A/C bracket to make room for the wastegate
flange. On the drivers side, we also had to lift the fuel lines and slid the wastegate
flange underneath. Getting the turbos to fit with the serpentine belt setup is going to be
a royal PITA. We will have to fabricate brackets for all the accessories. The A/C and air
are going, the alternator is going to the bottom passenger side, and the power steering
pump is going to be lowered a few inches. We also took lots of pictures, which will get
developed and scanned in soon.
The exhaust will be a challenge. On the passenger side, the heater core coolant lines are in the way. I'll try to guide them to the side, but clearance is still very tight. On the drivers side, the brake lines are very close to where the downpipe will go. I was planning on running 2.5" pipes, but I think if I use 2.25" pipes, the area is still greater than my 3" intermediate pipe. In any case, the turbos will not be ready in time for the F-body Memphis 98 Gathering. I am planning on finishing it in mid-june.
10/25
Well, the summer is over, I am back at Tufts, and many of you have been asking how the
Z28tt has worked out. We are still working on it, but on a longer timescale. The Camaro is
in NY, while I'm here in Boston. I did get a lot completed over the summer. The six speed
install went smoothly, and I fabricated a new crossmember which is much stronger than the
factory one was. This involved using my newest tool - A Lincoln Electric Mig welder! The
welds came out very well, and you can read about it in our six speed swap if you like.
The oiling system is under construction at this point. With various fittings, I connected the oil lines to the turbos. The oil drain lines are fabricated, but I need to add fittings to the oilpan. I lowered the oilpan the night before I cam back to Boston, and tapped it to accept the Earls 1/2" NPT fitting. As I know now, thin steel can't give a good seal against a coarse pipe thread. My next attempt was to weld a bead around the tapped hole. Very thin oilpans and a MIG welding arc don't mix. I was left with a swiss cheesed oilpan, and a now inoperable Camaro. There was no way to get the oilpan out without removing the engine, so it was left as is. I had to drive back to Tufts in my new (1980) $50 beater Mercury Capri (nicknamed Crapi). It ran well, but needed more oil than gas.
Another stumbling block was the engine accessories - alternator and power steering pump. These both got in the way of the wastegates.I need to fabricate brackets that move them into different locations. The distance and alignment is critical for a serpentine belt drive, so I've been taking my time getting everything perfect. The alternator will get moved to the passenger side while the power steering pump will be lowered about 2 inches.
The battery is stuffed into the rear spare tire well (where a can of Fix-A-Flat now resides instead of the spare). It isn't bolted down yet, but I'm working on a bolt in kit to make this possible.
Twin three inch air intakes look amazing in the engine compartment. Since the battery was relocated to the rear, and the fuel vapor canistor was pushed aside, there is clearance for the intake air ducts. I bought some flexible neoprene coated ducting from MacMaster Supply. The ducting clamps directly onto the turbos, goes between the fender and unibody to the K&N cone filter on each side. The cone filter is ziptied out of harms way at this point. No drilling was required, and the intake air will be nice and cool.
The Camaro was left in this shape untill I came back for Columbus day weekend in a last ditch effort to get it mobile again. We borrowed an engine lift, and removed the engine to get at the oilpan. To remove the engine means removing most of the drivetrain, which always takes way too much time to reinstall. I figured once the transmission was out, we could give it a rebuild (from a broken third gear shift fork). The engine was unplugged from the harness and put on a stand in the garage and the oilpan was finally removed. If anyone has any ideas on either fabricating a new oilpan or attaching 1/2" NPT bungs, please email me.At this point there was no way the Camaro would be driveable in a day.
Exhaust plumbing needs to be completed as well. We will try to get 3" tubing inbetween the engine and frame, but might have to use 2.5" exhaust tubes instead. We have 2.5" mandrel bends already, so that might get fabricated to get the Camaro on the road. The intake will be fabricated out of 2" tubing. I already have have some mandrel bends for that as well.
I determined that it made more sense to take my time completing ithe Z28tt properly, in a professional manor instead of slapping parts together. The car will be completed over the Thanksgiving weekend and winter break. I appreciate all the notes of encouragement, and regret not having the twin turbo project completed as scheduled. Work this summer took precedence with 60 hour weeks consulting. It was a great experience, but I didn't have enough free time to work on the Camaro. I'll update the website as more work gets completed.
12/3
12/3/98 |
Z28tt To Do List |
Oiling System
Exhaust
Fabricate intake
|
Design and make accessory brackets
Rear Mount Battery
Fabricate dual air/fuel gauge Get Energy Suspension poly engine mounts Remove windshield wipers, motor, tank |
1/25/99 - I purchased 1/2" NPT steel bungs from Chassis Shop, and welded them onto the oil pan in December. They welded on very easily, and the pan didn't get any holes blown through it either. The problem with welding it this summer was that the weld area was not sanded very well, so there was a poor arc. Unfortunately, the oil pan was stolen from the Tufts garage where we were working on an FSAE project car. I have to get another oilpan and more fittings, but I know that welding is the best way to do it.
Over Christmas break, I fabricated the intake for the engine. It's made of a Dynomax 2" mild steel mandrel u-bend. The bends were cut into several sections, giving the angles needed to join the turbos to the throttlebody. I took a 4" wide piece of sheetmetal, bent that around the throttlebody opening, and welded that at the seam to form an oval. A piece of 4" butyl rubber tubing joins this piece to the throttlebody. The oval was notched in the ends by aviation shears, and then with a die grinder to match the 2" pipe. Finally, we measured and calcualted what angles were needed in the bends, cut them, and welded up the pipes and oval to make the intake. Pictures will be online shortly.
We've done some partial work on accessory location, and I will be finishing that on weekends home from school. I'll weld up a new oil pan at that time too. Look for pictures soon!
3/3/99 - Over the last few weeks I've been driving home to NY from Boston every wednesday to work on the Camaro. The accessory brackets are all but finished. I basically moved the alternator to the lower passenger side, and added a tensioner right above it. A 1/8"x2" metal strap is bolted to the lower block holes. The tensioner (from a V6 f-body) is mounted to this strap on 6" bolts and spacers. The alternator has one bolt+spacer attached to the strap and the other bolt+spacer goes directly into the head. Everything is 3/8" coarse thread, by the way.
The drivers side was more of a challenge. I had to lower the power steering pump a little over an inch to clear the wastegate. I cut off the top half of the cast bracket where the alternator used to be, and bolted another strap to the drivers lower block bolts. One problem was a snapped bolt in a bolt hole. I broke three E-Z outs trying to get it out, and by that time the hole was offcenter. I just decided to drill and tap it offcenter for a 3/8" thread. The cast bracket bolts to the strap in one location and has a through bolt right above it. The question was how to prevent it from twisting under belt tension. Another local car enthusiast, Charles, came up with the idea of bolting the bracket to the last bolt on the side of the head. This cured all the twisting problems. We also needed to bolt an idler wheel right above the PS pump to prevent belts rubbing. I machined this piece at the machine shop here at Tufts. The pulley and bearing was grabbed from the former tensioner. I machined the adapter post to those dimensions, and will bolt it on as soon as I get a chance to go back to NY. The post will have a strap that bolts to the cast PS bracket to prevent additional flex.
Almost there...
4/3/99 - I've been burning the midnight oil again, now driving from Boston right after my last Thursday class to NY, and then back again after midnight on Sunday night. It's paid off, since a lot of progress has been made!
New Install Pictures Rear Mount Battery Install
Last weekend, I came home again from Tufts with the intention of finishing
the twin turbo project. I dropped the engine right in (and broke
the winshield wiper control box as it was crushed against the firewall by the larger super
ram intake). The new Energy Suspension poly engine mounts line up perfectly.I had to
remove the front springs to get access to the nuts holding the mount bolts on. I then
welded the engine mount nuts to the crossmember, unbolted the old mounts and
installed the new mounts. Spending 15 minutes welding now will save 2 hours later because
I wont have to remove and install the front springs.
I plugged in the myriad of sensors and connectors, and then started
working on exhaust. After buying about $100 of various 2.5" and 3" mandrel
bends,
straight sections, etc, I came to the conclusion that I hate exhaust work. I just couldn't
figure out how to fit an exhaust in there, and make it
removable (w/o removing the engine!). I'm having a Kook's Racing in Long Island, NY build
a mandrel bent exhaust for it, since I couldn't figure out how to do it. I
left for Boston around midnight Sunday night to go back to school...
This weekend I came back to NY again, and on Friday, finished the wiring, and installed
the distributor slighty (ok, more than slightly) advanced.
We tried cranking it, but the engine was fighting itself. The battery voltage would drop
to 5 volts during cranking as well (from 12V). This was
because the battery was freshly moved to the rear, and wired into my 4 gauge stereo power
lead going into the engine bay. I moved the batt onto
the windshield washer resevoir, connected it to the original wiring, and retarded the
timing 30 degress, and it fired right up! Oh yeah - my
exhaust consisted of a 3" elbow pointing to the sky directy from the turbos :) That's
my ghetto exhaust :) Vrooom, pseeeeeewwwww (my best
imitation of the sound) You don't really hear the turbos until you let off the gas, and
hear it spooling down. The exhaust note is incredible! The
sound is deep as hell, but isn't too loud. It sounds like a bigblock, but without the
ground shaking :) I love it (it isn't too loud, and is much
quieter than my open y-pipe experiment last year). Woooo Hooo!!! 8 months later, on the
same gas, it fired up!!! :) :) :) (Can you tell I'm
psyched?!!)
4/26/99 - It's complete! Cyrus Clark and I drove down to Kooks Custom Headers on Long Island to pick up the car. The exhaust was done very professionally. There are 2.5" downpipes from each turbo, joining into a 3.5" y-pipe. They even opened up the front of the cat to 3.5" and added a 3 bolt flange so we could swap the cat for a test pipe at the track. There are plenty of exhaust brackets and hangers keeping it all together. They also added 02 sensor bungs to both downpipes.
Once we got there, I expected to drive it home, but I had to re-route the sparkplug wires to clear the downpipes. We also swapped the map sensor to the 2 bar model (instead of going from -14.7 to 0 pressure, it goes from -14.7 to 14.7 psi, letting the ECM see boost). We started the car, and at any throttle opening, it ran like crap. Huh? It was the same map as before... Oh - there it is! We forgot to change the DFI calibration to use the 2 bar map sensor... It started right up, but both wastegates were open at idle (huh?) We figured out that the vacuum line really didn't need engine vaccuum, and instead left it open to atmosphere. The wastegates then worked the way they were supposed to.
We took it easy on the drive home (and stopped at a fellow list member, Mark Frouhar's place, for a few small adjustments). I needed to add 2 quarts of oil during the 80 miles! When we arrived home, we removed the tranny, and tightened the fittings for the oil supply lines. This seems to have solved the major oil leak problem, but there is still a leak from the intake manifold. I just don't have the time to remove the Super Ram intake and manifold to fix that right now. We tore the tranny apart, because we found an extra snap-ring on the workbench (from the previous week's rebuild). It turns out that snap ring isn't even from the transmission. There was no place where it could have gone...
Cyrus and I loaded up the Camaro for the drive back to Boston Sunday night. We left at midnight, and took our time getting back. During the drive, we probably averaged 50 mph in the 65, but there were a few times we opened it up. It was just for DFI calibration purposes (really, officer!) :) Wow! The car really pulls! It's much faster than my Cherokee! (I haven't driven the Camaro since July) The wastegates are set at 5 psi, and other than one run where it spiked to 7.8 psi, they are fairly accurate (they open around 5.2 psi...) I'm seeing 02's around low 700's with the current DFI calibration global file. Click it as "save as" to save it to view in Calmap.
4/27/99 - I took a few G-tech runs with a friend of mine, and the results were disappointing. The best was a 14.2@102. This was compared to my 13.5@104 last year. I think there is quite a bit of tuning left to do. I'll also try race gas and raising the timing. At 5psi, the total timing is really retarded at 16 degrees. Anything more, and I get a few degrees of knock retard. I'll be tuning all this week, and we'll see how it goes.
8/8/99 - Summer has been great! I've been very busy with SPD, met many interesting people, and had a wonderful time. Oh right, you just want to know about the Camaro! Since the last update, we took it to New England Dragway on a dismal night. It was foggy, and the ground was slick. I spun through first, short shifted second (got a 2.6 60'), spun through second, short shifted third, finally got traction as I motored past a Cobra, and flew though the traps with a 14.2 second run at 108. It should be 12's with some decent traction. The problem before was that I was only getting half throttle! The throttle arm was hitting a band clamp, not letting it open fully. We moved the clamp, and got an extra 100 hp :) The latest has been the installation of a full AutoMeter dashboard. You can view the pictures at http://www.eecs.tufts.edu/~askulte/ttt/gauges. When I get settled in to the new apartment in Boston (with a cable modem!) I'll add a real update.
11/18/99 - The Z28tt has been running great lately, in the colder fall
air. Currently the 30# injectors are holding my to 5psi boost. The huge
17x11's break loose at 3000 rpm in first gear! It looks like its time to
get some stickier tires, and beef up the drivetrain. A 9" rear will be
eventually installed. I'm going to fabricate a single plane EFI intake to
replace the SuperRam when the new 75 lb//hr injectors arrive, and install
the intercooler. Hopefully I'll have a chance to dyno before/after the
single plane intake, to see how the torque curve changes. We will
definitely be pushing the limits of the stock motor. Let's hope it lasts
for a short while!
In the December99 issue of Super Chevy Magazine Damon Lee used an SPD T56 crossmember in their Silver Streak Thirdgen project/sweepstakes car. The article, "Swap Shop" went into detail about swapping the T56 into a third-gen f-body, and said our crossmember worked like a charm! This is part 5 of the 6 part series. Many thanks to Damon Lee, and Super Chevy for the great article.
6/19/00 - It's about time for another update. The McLeod kevlar disc clutch is now slipping when I get into boost, even in just second gear. This will be solved as soon as I install the McLeod Street Twin dual disc clutch. This setup has a billet aluminum flywheel, a beefed up pressure plate, and two clutch discs with a floater ring in between. Mcleod claims it'll hold up to 900 hp, so it looks like the 10 bolt rear will be the next thing to break. The only drawback is the price (retail is around $1400, I believe) and the 37 lbs rotating mass. Work has kept me extremely busy, without much time to work on the Z28tt.
I've also been kicking around the idea of getting a custom license plate, such as Z28TT or TWNTRBOZ
Finally, if y'all haven't noticed, the regular Tufts email addresses no longer work. I appologize for not posting this sooner. Please use Z28tt@skulte.com in the future.
10/31/00 - Lots of news this time! The McLeod Street Twin clutch I picked up back in April is finally installed. This clutch has a billet aluminum flywheel and twin discs. The entire assembly weighs 47 lbs (flywheel, 2 discs, floater plate, pressure plate, throwout bearing) which even is a few pounds lighter than the stock LT1 clutch assembly. The slave cylinder needed to be modified by changing the GM 1.000" diameter sleeve to a .875" diameter sleeve. Unfortunately it leaked like a sieve, so I used the old plastic T5 slave case. It was identical to the LT1 slave and bolted right in.
Since the Z28tt was finally drivable, the first thing any sane person would do is to take it to the track. We went to
Island Dragway in NJ, which is now my favorite track - no crowds, nice folks, and good track prep. I think I'll start
with my excuses - I'm running on hard 2 or 3 year old Dunlop SP8000's that make the Eagle RSA's seem like ET Streets. I
didn't have a laptop with me, so the DFI tune is very conservative (way too low timing and super rich to keep the engine
alive for another day). I also forgot how to drive in my year long drag racing haitus (rental car drags don't count
since redline neutral drops barely spin the wheels). For the dirt -
Reaction times - all between .786 and 1.6 seconds (ack!)
My 60's were a neck snapping 2.25 to 2.66 sec.
Best, or something...
.876 RT
2.437 60'
6.083 330'
9.002 1/8
85.98 MPH
11.443 1000
13.480 1/4
113.90 MPH
So there ya have it! My car went 1 tenth faster with twin turbos. I did pick up 10 mph, though :)
I was running 111's to 113's the whole day, and dammit, I wanted a 12 sec pass! I did the unthinkable and borrowed my
T-Type friend's 15x10 drag radials. The car looked pretty mean with the big tires in the back. I did a quick burnout,
but didn't step on the brakes hard enough so I went sailing past the start lights... I back up, trip on both lights, and
wait. Wait some more... Track dude is coming to my window. Fook! I staged with the rear tires (doh!). I restage, rev it
to 3000 and wait for the last yellow. I let the clutch out, and hear a nice crisp snap as the engine revs up. Damn. I
snapped the drivers side axle completely. We pushed the car to the shoulder as the rear wheel is inching its way past
the fender. Oh well - I guess I *need* to get a 9" now. Twist my arm ;) I converted the videotape to a small 500k mpg movie. I expect with
some traction and a more aggressive tune, I should pick up another few mph and knock off a second or so. Now I needed to
rebuild the 10 bolt or purchase a stronger rear, so the next weekend I drove up to Canada and picked up a used Moser 9" rear with 35 spline axles and 4.10 gears as well as an aluminum driveshaft from another
friendly f-body list member.
11/16/00 - The intercooler system has begun! I decided to use a Spearco 2-182 core at the beginning of this project, and we're finally getting around to making the IC. To get the most air possible to the planned front-mount setup required cutting out the center of the front valence. We just used tin snips after removing the bowtie cover. The first idea was to just cut out the center section of the bumper with the plasma cutter, but after we did this, the hole was way too narrow. Next plan was to fabricate a tubular bumper that would tuck above the grille opening and not be visible. Pictures here.
The bumper was fabricated from 1.5" diameter DOM mild steel tubing, and
was bent to follow the contours of the valence. I used JD Squared's great
mandrel bender for it, and the results are perfect. The bumper is welded
to the pedestals which were fishmouthed with JD Squared's less than
stellar tubing notcher (bearings break quickly). This is all welded to
1/8" steel plate that is bolted to the factory bumper mounts. This bumper
weighs about the same as the factory, but should be stronger and also
gives a wide-open shot to the intercooler.
6/11/01 - Well, it's been quite a while since an update. Over the winter of 2001 the intercooler system was completed. I decided to use 2.5" tubing from the turbos to the merge, and 3" tubing to the IC core and further on to the throttlebody. 2" would have been easier, but the extra area of 2.5" will help minimize the pressure drop. The intent was to build the intercooler system once and for all, which means overkill for this low-boost engine. The flow losses take off once flow velocity exceeds 0.3 Mach, so the larger tubing was a must. We fabricated intake ducting to force high pressure air through the IC core and radiator. It works too well, since the front end gets light above 120 mph on the road course. An exit must be found for all that high pressure air other than under the front of the car.
At Memphis2001 Myron Cottrell of TPIS
lent me his wide-band 02 tailpipe meter. We found out that I was running
very rich (below 10:1!), and Kevin Crain and I tuned it back to
12.7:1. This
increased my mph to 113 (from 104) and I finally broke into the 12's. The
best of the day was a 12.8@113 with a 60' of 2.1 on Kumho road race
tires.
Later that day I tore my 1LE driveshaft in half with drag radials. Doh!
It's time for a chromoly shaft now. I also picked up a decoupled Herb
Adams torque arm from Bill Fong, so that should help my 60' times as
well.
As a side note, the brake ducts worked great on the road course with the
small factory front discs.
Summer/Fall update - I replaced the driveshaft with a
stock steel driveshaft, and went to the GMHTP Shootout at Englishtown. The
second run I broke the Herb Adams VSE torque arm completely off the
mount. Their welds had no penetration, and simply cracked. This tore up
another driveshaft and the rear a little. After some investigation, the
1/2" steel torque arm mount plate was bent! This was heated and hammered
flat as best I could, and then I re-welded it with the TIG welder (and
lots of penetration!) The driveshaft was replaced with
Denny's Driveshafts HD Aluminum 3.5" shaft with billet rear and front
yokes. The SouthSide Machine subframe connecters were welded in, and the
repaired torque arm mount was bolted on. To Matt Adams/VSE's credit, they
sent replacement parts, which was beefed up by using a 5/8" steel plate
instead. We'll see how it goes for next year's drag racing.
10/20/01 - Watkin Glen Time Trials - Executive Summary - Lots of
blowby, so we designed a catch tank system for the valve cover oil
breathers. The filler cap had to be siliconed shut as well, but the
oil blowby problem is contained. I turned a 1:19 on the long course,
so I'm very happy!
11/02/01 - Yesterday the few faithful's left for the track at the crack of dawn (actually, 6:30 because of oversleeping). The night before, I made heatshields for the turbos to keep from melting the overflow tank, and heating up the brake lines and master cylinder. The morning started with Mark Frouhar discovering a flat tire in my driveway. Once we made it there (passed an accident where a lady creamed the front end of a bus head on), we unleaded the car and went to register. The line was increadible! It took about 45 minutes to make it to the front (both pre-reg and day of registration was the same), and then we were all on the wait-list to get in. Argh! I should have pre-regged. Atleast it was 70 deg and sunny in November.
I got teched, and then went out on the track with the blue group (student, red, white, and blue). I took it pretty easy getting the tires warm (32 rear cold, 34 front cold on 315/275 17" Kumho's), and after 2 laps, I got the infamous "meatballw black flag w/ red center. This is for a mechanical, so I pitted in. The cornerworkers saw fuel sloshing out the filler neck. I guess I shouldn't have topped 2t off!
We hit the local roads to burn off some fuel (I tried siphoning, but gagged before I could get it to work), and came back for the 2nd session. This time I lined up in front of my frienp's (roadraces a 3rd gen Rx7) dad, who races a show condition '63 Vette. That was fun playing! Afterwards, I siphoned out a whole mity-vac container's worth of blowby oil from my breather catch tank system. I think she's gonna die soon.
Lunch at LRP was excellent, we discussed lines with some Skip Barber
instructors one my friends knew, and then hit the track for the 3rd
session. The tips worked great (scarifice turn 3 for turn 4 leading onto
the backstraight, and put the RF tire onto the R corner of the concrete
strip into 4's turn-in for the perfect line with a little banking). We had
a 3 car freight-train going, and I finally was let by the Ingegra (had a
1:04 in time trials). I was behind some Porsche, who insisted on drag
racing all the straights. I would get next to him, start slowly passing
him (I need more power!) and then run out of room, so I backed ofR for the
corner and let him back in (per rules). I would be on his ass throughout
the corners, and start to pass again, and run out of room. After about 3
laps, he finally let me by. One lap later, the Z28tt shut down and coasted
to a stop. I put it on the inside grass of the uphill corner, which seemed
to be the safest spot, and then got towed back to the pits. Holly hot
engine batman! I had burned through my high-heat breather hose system (not
touching, but 4" away from the turbo's). My dipstick cap was melted, along
with a myriad of wires and connectors running along the passenger frame
rail. The shields kept the heat in, which was focussed on the bottom of
the engine. I'll have to check my sparkplug wires too. Results - a 1:05
lap in traffic, which is what I was shooting for, which would have placed
me in the top 10 (out of about 120 cars or so). My elec system is toast,
since Iam getting lights, etc, but no reading on the voltmeter or any
instruments/radio/ignition. Time to pull the Z28tt off the road and begin
the winter-modfest. Bwah ha haaa! :)
03/05/02 - Winter Update
In November, we pulled the engine and transmission, thinking we'll get to
dyno it soon. Other priorities came and went, and the focus is back on the
Z28tt. The engine is on the stand, and I just need to make a stand alone
engine harness with fuel system to run it on the GCR Motorsports engine
dyno (setup for carburators currently). The Z28tt has the interior
completely removed (the rear carpeting in the trunk well is rubber coated
on the backside, and must weigh over 30 lbs). I've also begun fabricating
the full rollcage. It is constructed from 1.75" OD 0.095 wall 4130
Chromemoly tubing. The main hoop is bent to follow the contour of the car,
and the halo hoop follows the roofline. All tubing was bent with a JD
Squared mandrel bender, which unfortunately is manual. The hydraulic
powerpac would make the job easier, but what fun is that?!! We made a
stand that goes into the Durango tow vehicle's trailer hitch to anchor the
bender, and with a 4 foot breaker bar, it isn't too bad. The A pillar
beams are bent, and will penetrate the dashboard. I'm currently working on
the fishmouth joint for the tie-in to the halo hoop. It's pretty complex
since it hits the halo on a bend (angle 1), is coming up the A-pillar
(angle 2), and is moving closer to the cars centerline with the A-pillar
(angle 3). The best method so far was to have slide the 1.75" OD profile
tool to the halo to capture the profile, and trace it onto the A-pillar
bar with a paint marker, with the help of my roommate, Adam. I cut it out
with the plasma cutter, and will be grinding it to shape. Remember -
measure 3 times, trial fit it twice, cut, measure again, trial fit, cut
measure again...
03/18/01 - I've ordered the block and heads! The Dart Little M block should be arriving this week from Flatlander Racing, along with a set of Airflow Research 210 Race Ready heads with titanium retainers. I could have gone to 220's (or 14 degree heads, for that matter!), but wanted to keep velocity up for some decent street manners, and to help fight the enormous exhaust backpressure. The block has a 4.125" bore, and I'll be going with a 3.750" crank and 6" rods.
I've also made significant progress with the rollcage. Last weekend we
nearly finished the front half of the cage, and began working on the rear
half. Hopefully two more weekends should be it. Take a look at the
Z28tt
Rollcage Fabrication Pictures here.
05/05/02 - Spring Update
The cage has been installed in the car, and everything is tack welded in
place. I will be finishing the welds during the evenings this week. It
fits very tightly, and I've got over 200 pictures (will be posted soon!).
Nearly all of the engine parts have been received! Take a look at
the Engine Specs.The block
just has to be finish honed to 4.120" (rough machined from Dart at 4.115),
pistons and cam ordered, and then assembled. I spent last week deburring
the block with cartridge rolls and the die grinder. The machine shop will
have the block for about 5 days, and then it's another 3 weeks for JE to
make a set of pistons. Memphis '02 will be very close this year. I can do
it!
11/14/02 - Fall Update
The Z28tt website was mentioned in the December 2002 Issue of
Popular Hot Rodding
Magazine
letters section.
Thanks for writing in (and please email me so I can find out who you are!)
The Z28tt was consuming my life, so I decided to take the summer off for
wakeboarding and waterskiing. If it's not fun, why do it? Last month I
picked
up where I left off. The custom JE pistons were ordered from
Thunder Racing and arrived one
week
later. The specs given were 28cc dish, 1.151 compression height, inverse
dome
to match the AFR 210 heads, double pin oilers, double spiro-locks, gas
accumulator groove
and machined for a 4.1215 finish honed block (for 8.25:1 static
compression). They
sent the pistons with a .0045
clearance which seems tight, but thats what the
JE engineers designed the piston for. They were weighed at 493.7g to
495.6g. I'll
remove a little material from the heavier pistons so they all match
(overly anal here!).
We decided on the JE 51 Series tool steel wrist pins - 2.950 length x .180
wall. They
measured at 0.9271 to 0.9273" in diameter at various points.
The pins are extremely heavy, but will minimize any bending from the large
cylinder pressures.
Since I don't plan on turning high rpms w/ the hydraulic roller cam, this
was
a good compromise. This pistons are being sent to Swain Tech Coatings for
their
Thermal Barrrier
Coating
on the piston face and Poly Moly friction reducing coating on the skirts.
The wrist pins are being sent to Anatech for the diamond like carbon
(DLC) Casidiam coating. The Nascar
Winston
Cup folks swear by the Casidiam coating, on preventing wrist pin bore
wear, and
it's inexpensive insurance to keep the rotating assembly lasting.
I've sold the Accel Super Ram intake, and it's being replaced with the Accel Pro-Ram single plane EFI intake manifold and Force Fuel Injection 1000 cfm throttlebody bought used. I've also picked up a set of adjustable Koni Yellow Sport shocks and struts, 950lb and 175lb Eibach springs, and Ground Control Adjustable Spring Perches also purchased used. My adjustable Koni Red's, cut Moog 7664 front springs (near 700 lb/in, I believe) and Eibach Pro-Kit rear springs weren't stiff enough, as the suspension would bottom out in the compression at LimeRock's downhill corner. Those will be sold to help pay for the new (to me!) parts.
As soon as I get the internal parts back from coating, we'll have to
clearance the block
for the larger stroke, and begin assembly on the engine. There are
thoughts of doing the
One Lap of America in 2003 or 2004.
10/20/03 - Fall Update
Well, another year has gone by, and the Z28tt is this -><- close to being
finished. Many of my spare weekends have been spent crewing for the #06
Corvette of Joey Scarallo in the TransAm Series. With the season winding
down, I can spend more time on the Z28tt. This spring, the Dart Little M
400 has been carefully assembled with KevinC (We washed the garage floor 5
times before the water wasn't dirty, and kept all unused surfaces covered
- how's that for clean!). The Accel Pro-ram intake was installed, along
with the AFR Hydra-Rev Kit. We're using a Force EFI billet 4 barrel
throttlebody, along with the low clearance Turbonetics carb bonnet. There
is plenty of clearance between the top of the bonnet and the bottom of the
hood with this combination. I did have to cut of the TPI throttlebody
adapter, and extend the piping from the intercooler further back to the
new throttlebody location. The ATI balancer went on no problem, but the
roller pilot bearing came slightly oversized, so we substituted the
standard brass bushing, which went right in. I wanted to keep the engine
bay uncluttered, so I spent many hours coming up with the perfect fuel
line routing, without dead-ending the fuel rails. This install has the
Earls -10 Y block and Aeromotive fuel pressure regulator connected to the
drivers fuel rail directly, while the passenger rail is connected with a
-8 braided line to the Y-block, and a -6 to the fuel pressure
regulator. Currently, I'm using the GM OEM hard lines from the tank, and
have adapted it to braided line. All exposed hoses and wires will have
Firebraid sleeving protect them from heat.
The largest undertaking has been designing and making an entire new wiring system. When the Z28tt came off the road in Nov2001, it was due to melting much of the engine bay wiring in a time trials at LimeRock Park. The new wiring system keeps as much as possible inside the car. There is the main ECM panel which has the Accel DFI ECM, Acceleronics Low Impedence injector driver box, and the Accel 300+ ignition. The backside has mounts for six 30 amp Bosch relays, terminal blocks so wiring can easily get changed for future proofing, as well as a 20 position fuse box installed with circuit breakers to protect all components. This connects to the engine bay harness with a 36 pin Trident circular connector, to make engine installs quick (just the trident connector and the starter motor have to be connected) and make engine dyno tests possible. Might as well take the time to do everything right. This panel installs just behind the dash, with quick release Dzus fasteners for easily installation and removal. At this point, only the engine bay wiring needs to get finished, and the dashboard re-attached to the car.
Pictures from this
months progress can be found by clicking this link.
8/11/04 - Summer Update It's been quite a while since the last update! The separate electrical ECM panel is complete. When we went to fire up the new engine, we did not get a reliable spark, which tested out to only be 5,000 volts (should have been 40,000 volts). Even though the coil tested fine according to the service manual procedures, it was replaced and all was well. The next issue was low oil pressure, even with 15W50 break-in oil. We changed the smallish Bosch filter for a large Fram HP4 racing filter, and pressure jumped 15 psi. The small filter may have gotten clogged with the Redline break-in grease. The Fram was replaced with a Wix 51062R racing filter and Mobil One 15W40 oil after the break-in was complete at the National F-body Event at Indianapolis Raceway Park this June. We attempted to tune the air/fuel on the track, but it was much easier with a few miles of street driving. Once the tune was in the ballpark, the Z28tt could actually be raced! It was down since November of '01 from the wiring meltdown at LimeRock, and now finally running. Life is good.
After the NFME event at IRP, there was an EMRA time trials on the Pocono North course, using one of the banked NASCAR turns. The Z28tt handled pretty well with the 950 lb front springs, 175 lb rear springs and Koni Yellows, and was slightly tail happy, so I'll change down to a smaller 21mm rear swaybar from the current 24mm bar. There is the 36mm hollow front bar on there right now, and tires are old Kumho Victoracers (315's in the rear and 275's up front). I did manage to get the 2nd fastest time of the day, a 1:01.71, so I left home happy. The new issues with the extra cornering is that I was getting oil starvation on all right hand corners, as well as oil overheating (pegged the 300 deg Autometer gauge, so it was in the 340 degF range). I added an 3qt Accusump to the oiling system (I already have a Canton pan), mounted behind the dash, a CM remote oil filter, and a TruCool oil cooler between the radiator and intercooler. We'll see how that works out at Watkins Glen next month.
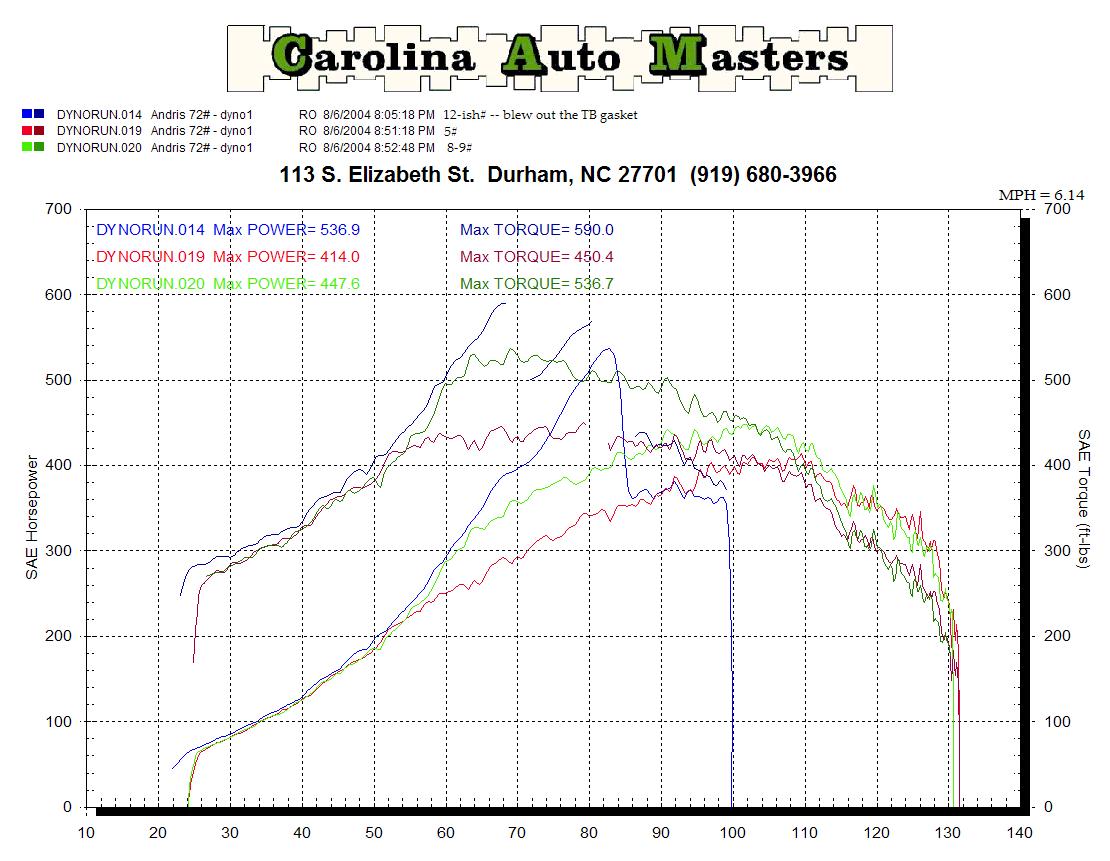
This past weekend I loaded up the Z28tt, and headed down to Durham, NC to visit Jeff, John, and Pat at Carolina Auto Masters for some dyno tuning. Over 2 days, we managed to get 20 runs in, and played with various combinations. The existing tune was decent, but very conservative on the timing (24 deg at 5 psi), so we bumped that to 27 deg, and then again to 30 deg (not much change over 27 deg). Afterwards, we made a $1 boost controller with some brass barb fittings, a tee, and a small ball valve. At 5 psi, we got 414 rwhp and 450 rwtq. The boost was turned up to 12 psi, and we got 447/536. Unfortunately the boost started dropping off after 4k, possibly showing how restrictive the 2.5" downpipes and 3" catback were. Just for curiousity, we disconnected the wastegates completely. The boost climbed to 17 psi, and then the spark was blown out by 3800 rpms. I guess the stock HEI ignition (new plugs & .034 gap) just couldn't keep it lit. We did get 537/590 at 3800 rpms, though! I have the Accel 300+ wired in already, and will disconnect the catback exhaust the next time I take the Z28tt to the dyno. The guys at CAM were a big help getting all the testing done in just 2 evenings.
Finally, I stopped at Muscle Motor Parts in Huntersville, NC to pick up a NASCAR exhaust, with the flat side pipes (boom tubes). This will be fabricated into a 3" dual exhaust, from the turbos back, most likely this winter, and should take care of the backpressure problem.